

A Practitioner's Guide
Agentic Data EngineeringGoing from ad hoc prompts to production playbooks with the Coalesce MCPs.
Transform
Catalog
Quality
Hands-on with Coalesce MCPs
Contents00 · Introduction
IntroductionAgentic data engineering is all about using AI in your existing workflows. It's mainly aimed at integrating AI into tools you already use through MCPs. While it's focused on the Coalesce product suite (Transform, Catalog, and Quality), most of the lessons apply regardless of which tools you use. We focus on the workflows you most often find yourself doing: planning a change and checking its downstream impact, getting to the root cause of an anomaly, implementing data governance processes, or generating the same report every week. This guide covers everything from a single ad hoc prompt to a production playbook. Whether you are exploring on your own, building skills for your team, or putting workflows into production, you will find practical tips and real examples throughout. What you'll learn
Who is this for
What you'll get out of this guideBy the end of this guide, you'll know how to get started with the Coalesce MCPs, follow best practices for prompting, designing and testing skills, and how to decide what to consider before putting them into practice.
Chapter 01
01
FundamentalsWhat an MCP is, the server, its tools, and the framework. 01What an MCP is
02How to understand MCPs through tools
03Three levels of working with the MCPs
Fundamentals
What an MCP isMCP stands for Model Context Protocol. It is an open standard that enables a client such as Claude or Cursor to provide a large language model (LLM) with structured context from other tools and data sources. This gives the model context and metadata that would otherwise be unavailable to it. At Coalesce, we have an MCP for Transform, Catalog, and Quality. Each one exposes many of the capabilities you'd otherwise reach through the UI. For example, with the Catalog MCP, you can programmatically extract the column-level lineage to determine the exact impact before making a change. With the Transform MCP, you can ask it to implement those changes. And with the Quality MCP, you can have it run a full root cause analysis, extracting metadata around similar issues, recent code changes, logs, errors, etc. 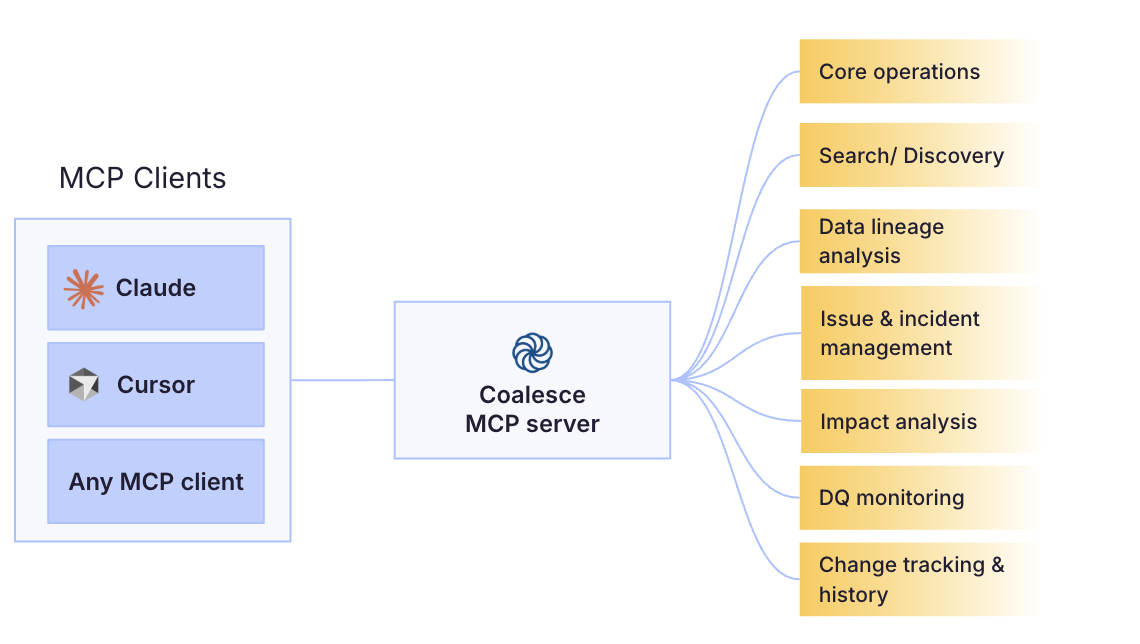 How to understand MCPs through toolsYou can get a long way using the MCPs out of the box, but it's often worth understanding the platform's inner workings and the tools it offers. A tool is a function an MCP server exposes to the agent, typically a single action like fetching data, changing state, or triggering a workflow. The agent decides when to call a tool and the server runs it. The set of available tools defines the boundary of what the MCP can and cannot do. Every Coalesce MCP tool ships with a description. It tells you not just what each tool does, but where its limits lie. The more specific the instructions baked into a tool, the more deterministic the output. Open-ended API calls leave all the interpretation to the LLM, which can quickly take things off the rails. Example tool
catalog_get_column_lineage walks the column lineage graph exhaustively with no depth cap, but caps out at 10,000 nodes by default to avoid pathological graphs.
Tools also map onto the steps a person would take. If you ask the agent to investigate potential root causes of an issue using the Quality MCP, it works through the same metadata a data engineer would, one tool at a time, choosing each call from the tool descriptions and what it has learned so far:
Each of those is a separate tool with a defined scope. The agent chains them, feeding what one returns into the next, and it branches or stops early depending on what it finds. Reading the tool descriptions tells you which of these the MCP can do, and where it will stop. If you haven't specified the steps, there's no guarantee that you'll get the same result the next time you ask the LLM the same question. A useful trick is to ask the LLM to specify exactly which tools it used and in which order. With that at hand, you can create reproducible prompts that produce more deterministic results (more on this in chapter 3: Skills). 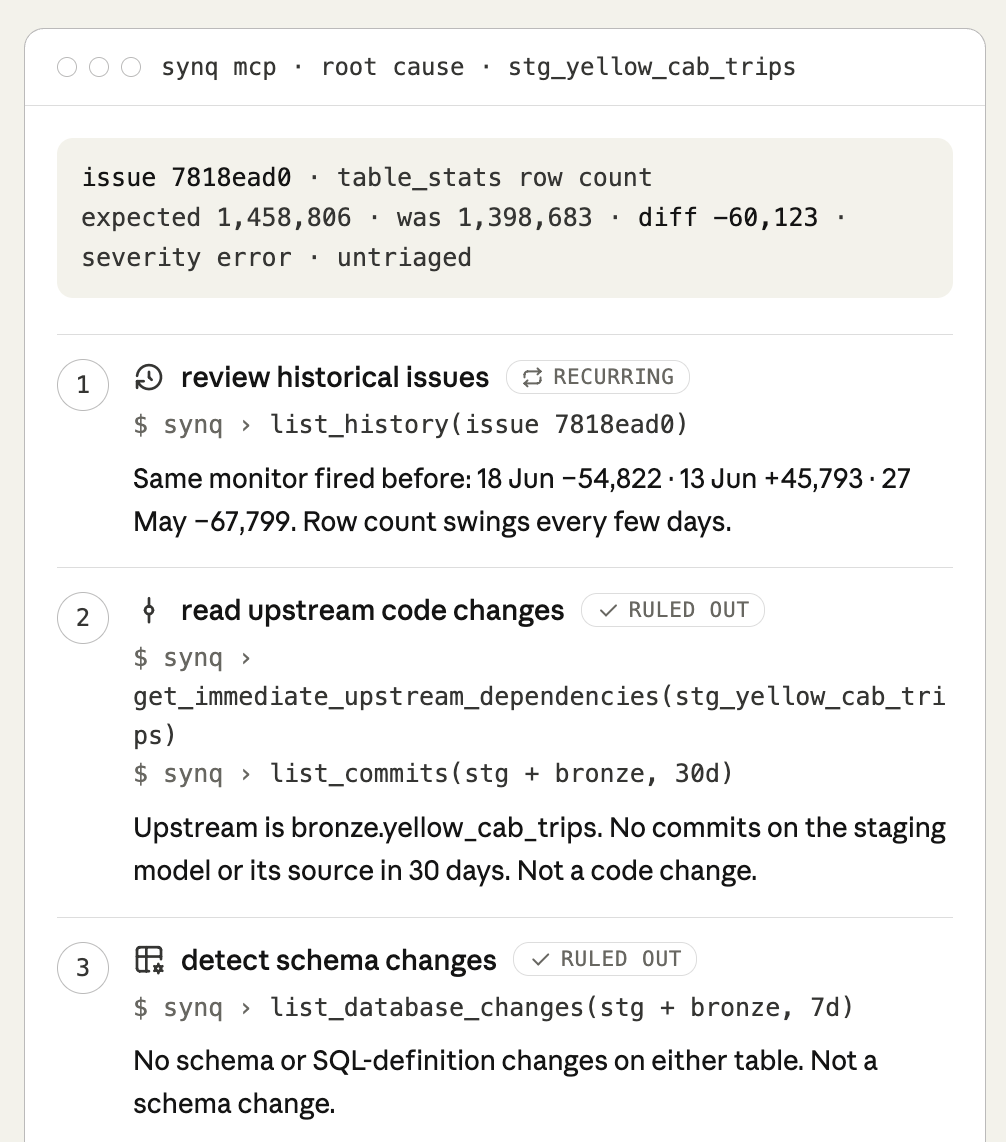 Some MCP servers also help here by shipping their own routing context, telling the agent which tool to reach for before it starts guessing. It's worth checking whether an MCP provides this, since it does some of the sequencing work for you, though your own skills are still what pin down the exact path you want to run every time. Three levels of working with the MCPsYou can work with MCPs through one-off prompts, but there are also cases where it makes sense to productionize workflows through skills or playbooks. 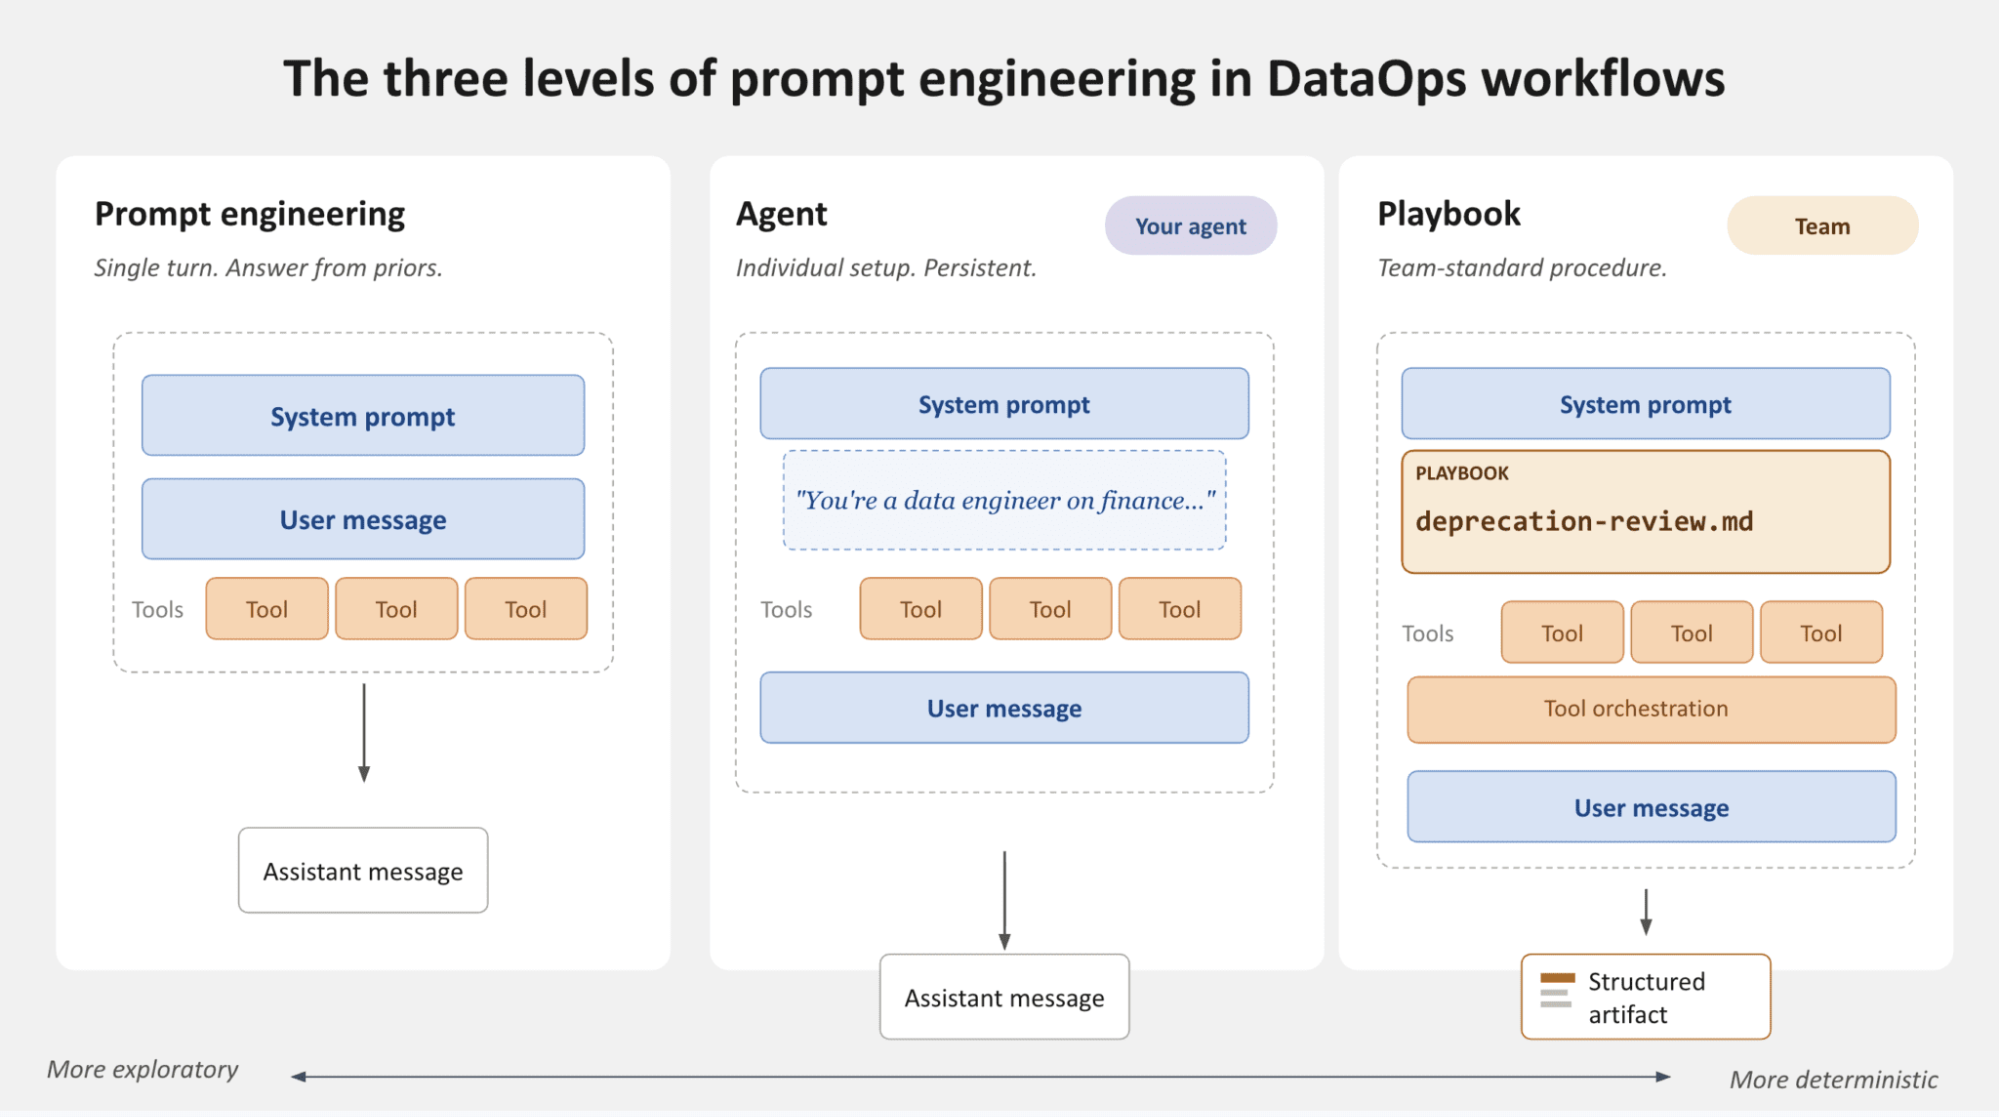
Chapter 02
02
PromptingAd hoc MCP use, one question at a time. 01Choosing your LLM tool
02Writing good prompts
03Extend and chain MCPs to automate workflows
04Limitations of prompting
05Managing permissions and data access
Prompting
Choosing your LLM toolYou're likely already using prompts in tools like ChatGPT and Claude Desktop, and coding tools such as VS Code or Cursor. There are two main interfaces you'll typically use to engage with MCPs: code editors and chat interfaces. 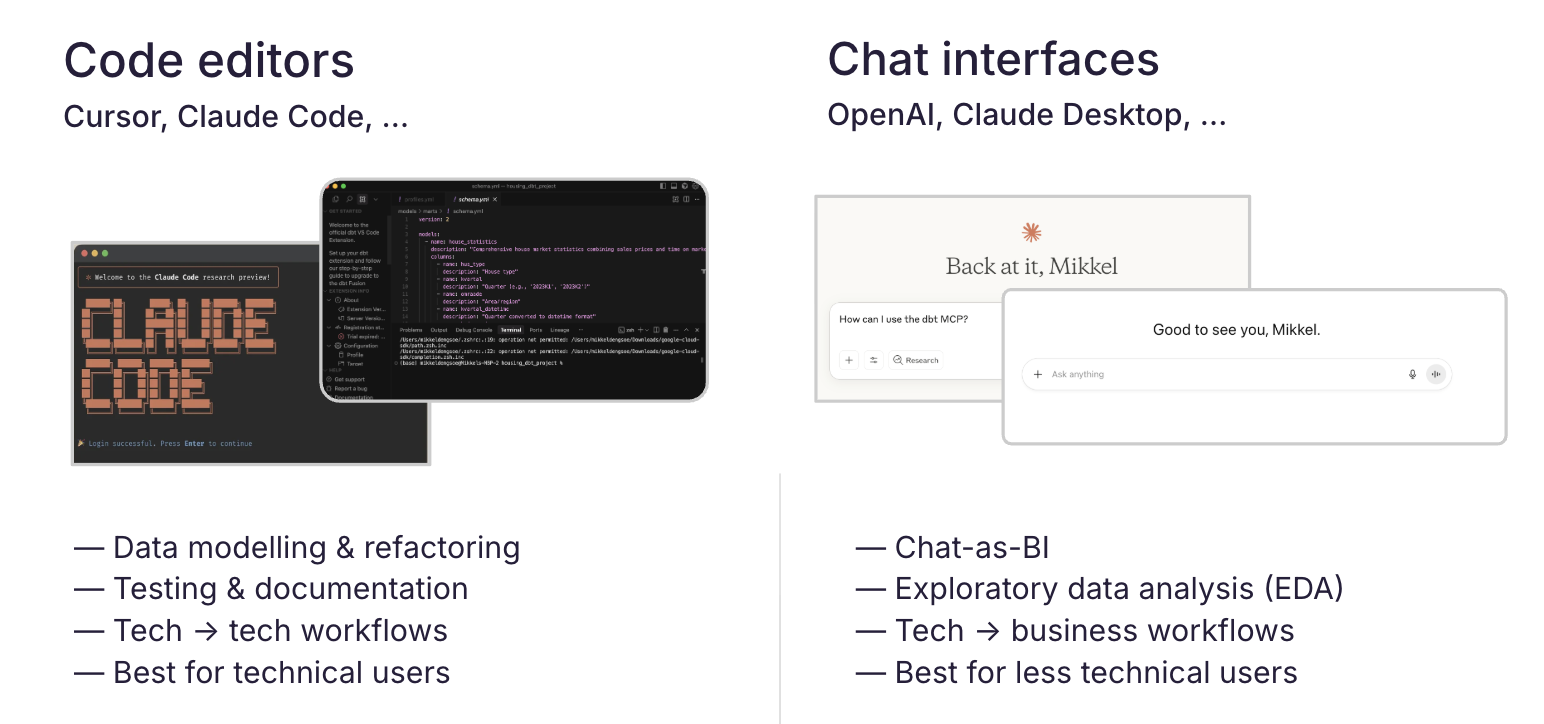 For use cases such as data modeling, you're most likely using a code editor, while for ad hoc exploration, a chat interface often works best. It's worth considering the user experience for both, especially if you start developing tools and skills that a wider audience will use. Writing good promptsA good prompt gives the model enough structure to be reliable without specifying every detail. What a good prompt includesThere's no one-size-fit-all answer to writing good prompts, but here are a few tips we've seen help
Finding the right balanceBelow are three examples of prompts to add tests to a data source - one that's too specific for most use cases, one that's too vague, and one that strikes a better balance. Too specific
Add It names every test, threshold, and column. It leaves no room for judgment and assumes that you got everything right the first time.
Too vague
Add tests to make sure data looks correct and updates as expected. You can add some checks for missing values or old data. Start simple and add more coverage as your data processes become more stable. No specifics, so the output is generic and you end up doing the real thinking yourself.
Just right
Add tests to the table It gives the model a specific set of guidelines (for example, don't test a passthrough column) while leaving the right level of freedom for it to come up with ideas.
Give the model room to ask and disagreeFor anything non-trivial, tell the model to ask questions before it writes anything, and to push back if your instruction will not hold up. Is there any information or data I can share with you to help improve the tests you suggested?
This helps confirm the model has the right level of detail before adding tests. Finally, you can help the model avoid context overload. For example, parsing an entire project or every schema risks burying the request, and the model focuses on material it does not need. Point it at the one model and the handful of upstream tables that matter. It's also recommended that you start a new conversation when you're moving to a different task or feature to reset the context window. Extend and chain MCPs to automate workflowsThere's no shortage of questions you can ask. To learn where you can expect good answers, start by understanding what tools each MCP offers, and check the docs for example questions. 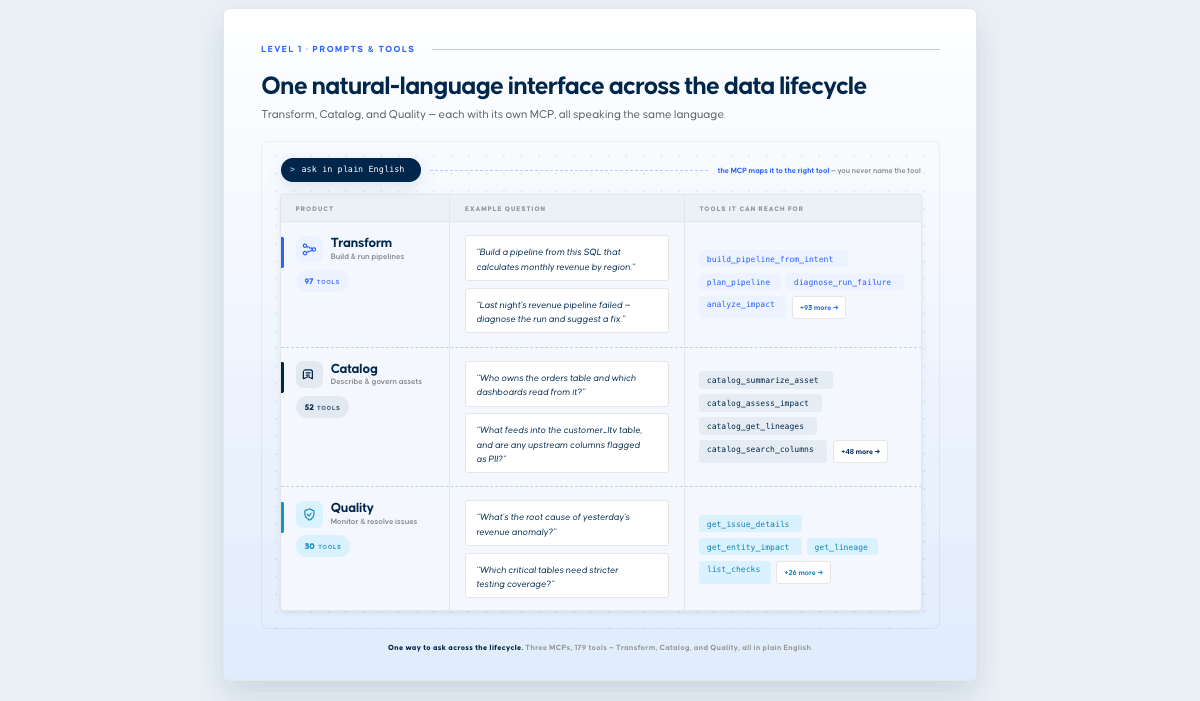 You don't have to stop here. MCPs become more useful when you combine them with the other MCPs your team already uses. Most clients let you connect several at once, and the model will call across them in a single prompt. Here are a few examples of how to use Coalesce MCPs alongside other tools.
Limitations of promptingStarting with basic prompting is a good way to get familiar with MCP capabilities and see results right away. It is worth keeping an eye on a few common limitations.
Managing permissions and data accessIf you are using the Coalesce MCPs in production workflows, it is worth being deliberate about permissions, especially around read versus write access. Read Read access lets the MCP inspect lineage, catalog metadata, quality status, and code. Write Write access lets it make changes directly, assigning owners, creating tests and monitors, or committing model code. Below are a few recommendations to consider as a starting point:
From prompt to skill
From prompt to skill
In Anthropic's own words, you can think of MCPs as providing the professional kitchen and tools, and skills as the recipes that tell the MCPs what to do and in what order. The good news is that all the lessons you've learned here about writing and designing good prompts also hold true for skills.
Chapter 03
03
SkillsPackaging workflows into reproducible recipes. 01Introduction to skills
02Designing a good skill
03Creating a real-world skill
04Planning a skill suite
05Evaluating & sharing skills
Skills
Introduction to skillsA skill is a Markdown file (SKILL.md) plus optional supporting files that provide instructions about how to perform a task. This helps you encode workflows so they're performed consistently each time and share standardized ways of working across your team. For the rest of this chapter, we'll focus on skills as used through Anthropic's products, although they're starting to get popular in other tools as well. To use a cooking reference, the best way to think about a skill is as a recipe. A good skill spells out four things, just as you would when writing an instruction doc for a colleague.
When a new conversation starts, Claude automatically checks your request against the available skill descriptions to see if one fits. You can also force it by typing / to bring up the available skills. i
NoteSkills are only as good as the data they can access, so the more context you pass through the MCPs, the better the skills built on top of them. If you've already set up and connected your MCP tools, you've done the hard part and are ready to go.
Designing a good skillThe first part of a skill is the description. This tells Claude when to load the skill and is important to get right. A good description has three parts: what it does, when to use it, and its key capabilities. Skills also rely on progressive disclosure. The header is always loaded; the body loads when the skill appears relevant; and any linked files load only as needed. That keeps token use low while keeping the expertise available when it matters. The better the description, the better the first iteration of the skill. Below is an example of a good description that's specific, actionable, and with a clear trigger. A good descriptionGenerates a weekly data quality report from Coalesce Quality and posts it to Slack. Use whenever the user asks for a "weekly data quality report," "Coalesce Quality weekly summary," "data health digest," even if they don't use those exact phrases. Covers open incidents, issues by severity, failing monitors, and affected entities over 7 days. The two below are weaker starting points. Descriptions that need work"Create a weekly data quality report." Says nothing about when to trigger or what it contains, and leaves too much up to interpretation about which metrics to use.
"Use Too technical for a first draft. Claude captures a lot of this from a good natural language description. Go back and edit the skill with the technical details later.
When designing the core of a skill, you should start with the use case in mind and write the steps as you would to a colleague. Here you specify what the user wants to accomplish, which best practices to encode, and which MCP tools to use. With this, you get repeatable results, unlike ad hoc prompts, which can vary from one run to the next. Below is an example of a good use case description. Use case
Weekly Data Quality Report
Result: Weekly data quality digest posted to the chosen channel, with empty sections kept visible
Below is an example of a complete skill designed with best practices in mind: 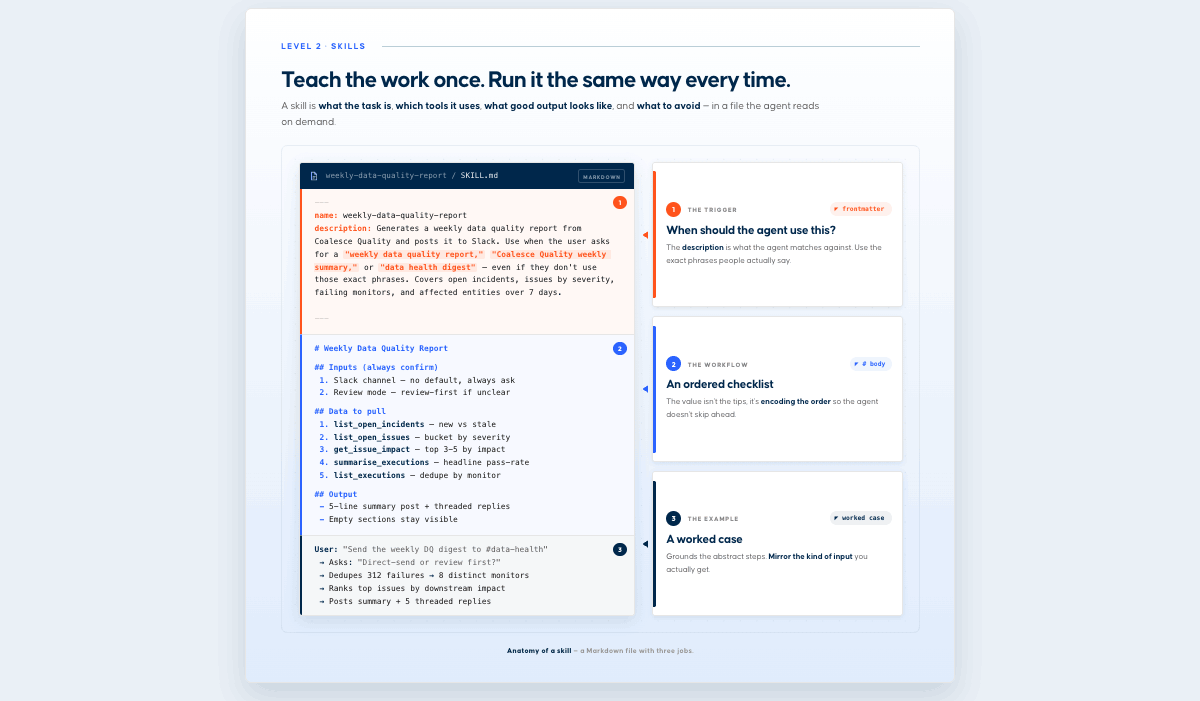 Creating a real-world skillThe steps above – integrating MCPs, writing clear descriptions and use cases, and specifying the expected result can take some work to get right. Luckily, there are creative tools to help you get started. Claude's skill-creator is excellent for kickstarting the process and only requires a description. With this, you can iterate fast and fine-tune your skill so it produces the output you expect. Back to the data quality report example, this is the result we ended up with. 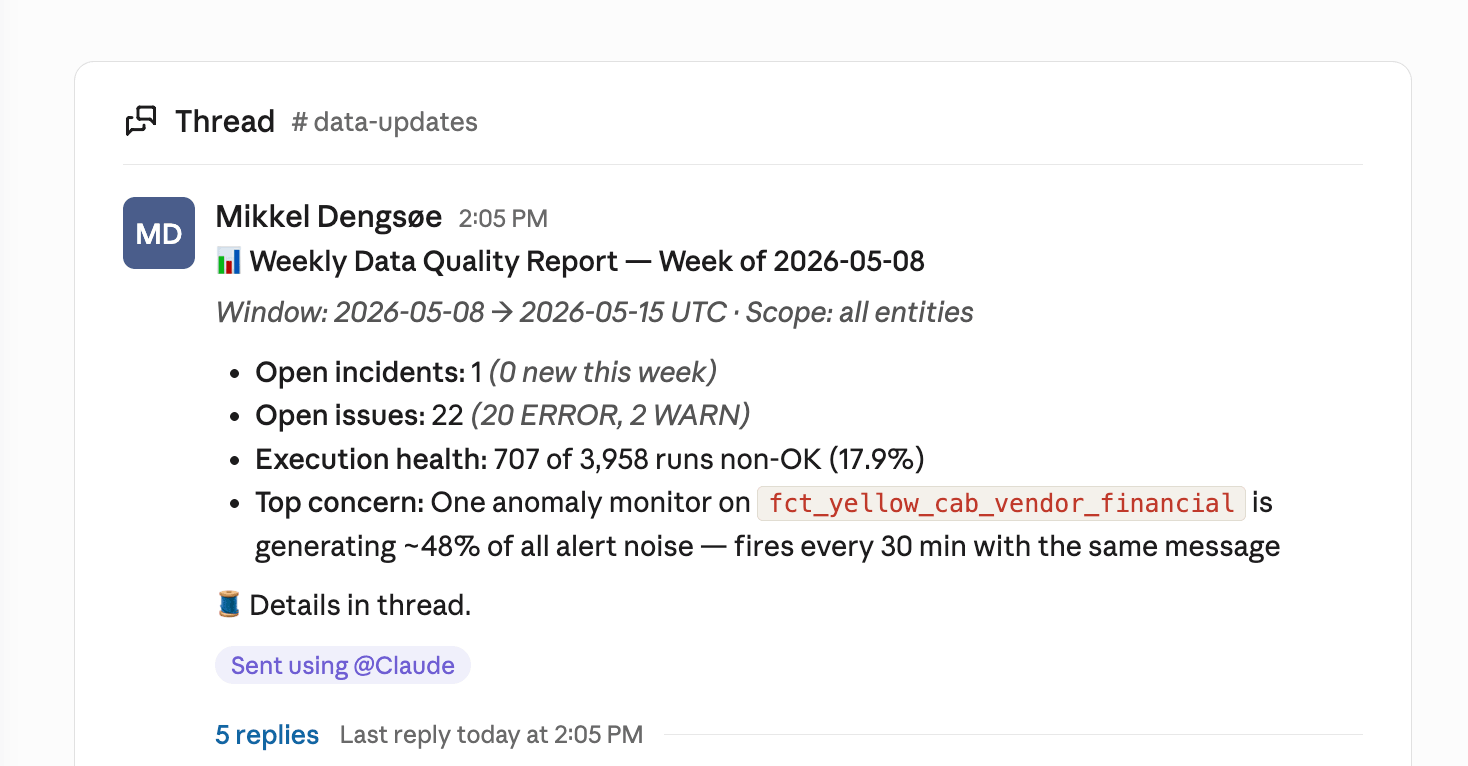 The process we went through to create this shows what an iterative process like this often looks like. Here are some considerations we had to give feedback on only after seeing the first version of the report.
Planning a skill suiteFor data roles specifically, think of data skills as jobs to be done. These can be grouped into areas of responsibility such as data quality, data modeling, analytics, and data governance. Each job category contains specific jobs. This is powerful and, for example, lets us encode our testing philosophy as a skill, so each time data engineers want to add new tests, they can do so using the 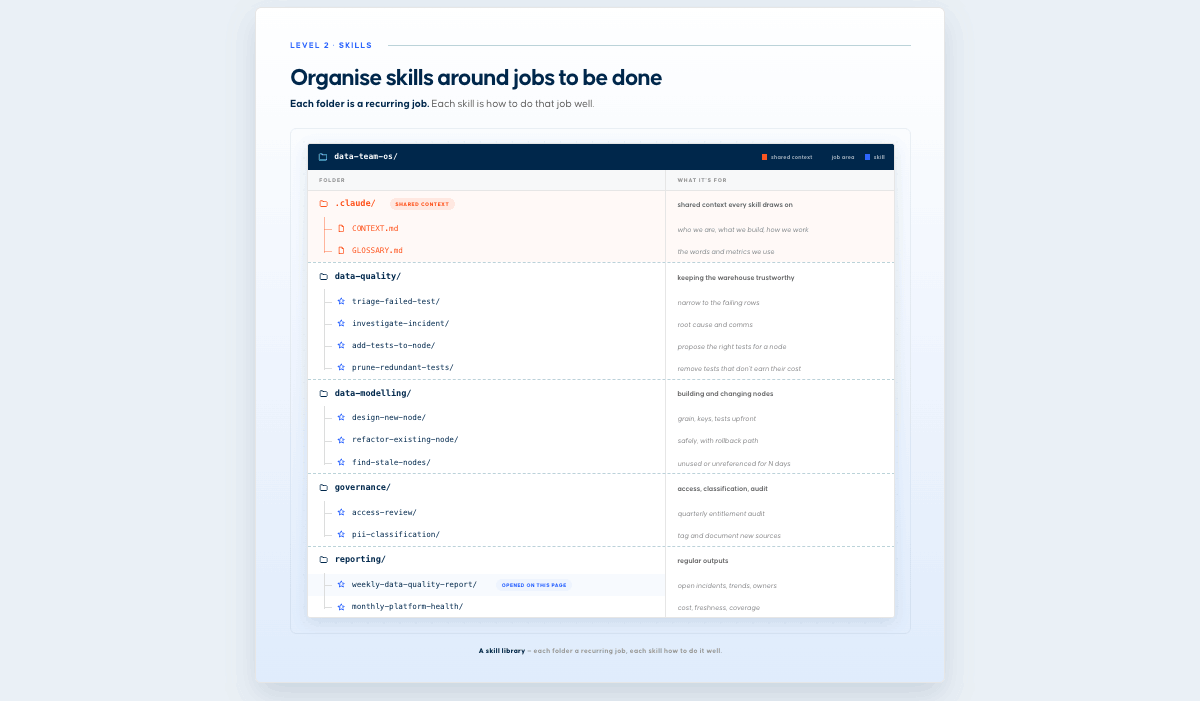 As a rule of thumb, the more often you find yourself doing a workflow, and the more time it takes, the more likely it is to benefit from being converted into a skill. Each skill includes a description that helps Claude quickly find the right one for the job. So when someone asks to "triage this issue," the model consistently points them to that skill, and they get all the right context, instead of the model chaining LLM calls and reinventing the workflow each time. That's the benefit of building out a deliberate skill suite and a good way to figure out which skills you should build. Extending skills with other assetsYou can extend skills with assets beyond the main content of the SKILL.md file. This can be anything from specific scripts you want to execute as part of the skill to other references, templates, etc. your-skill-name/ ├── SKILL.md # Required - main skill file ├── scripts/ # Optional - executable code │ ├── process_data.py # Example │ └── validate.sh # Example ├── references/ # Optional - documentation │ ├── api-guide.md # Example │ └── examples/ # Example └── assets/ # Optional - templates, etc. └── report-template.md # Example Evaluating our skillIn many cases, eyeballing the results tells you how well a skill works. Sometimes it makes sense to be more systematic, through three lenses:
Claude's skill creator comes with built-in testing. You shouldn't use this 100% as a replacement for manual testing, though it does give you a more systematic way of assessing skill quality, especially as you start growing your library of skills. We ran a small benchmark: three test cases, each run twice, once with the skill loaded and once without. Each run was graded against five objective assertions, such as whether it contains a TL;DR, deduplicates the noisy monitor, calls out P1 downstream impact, and is Slack-formatted. 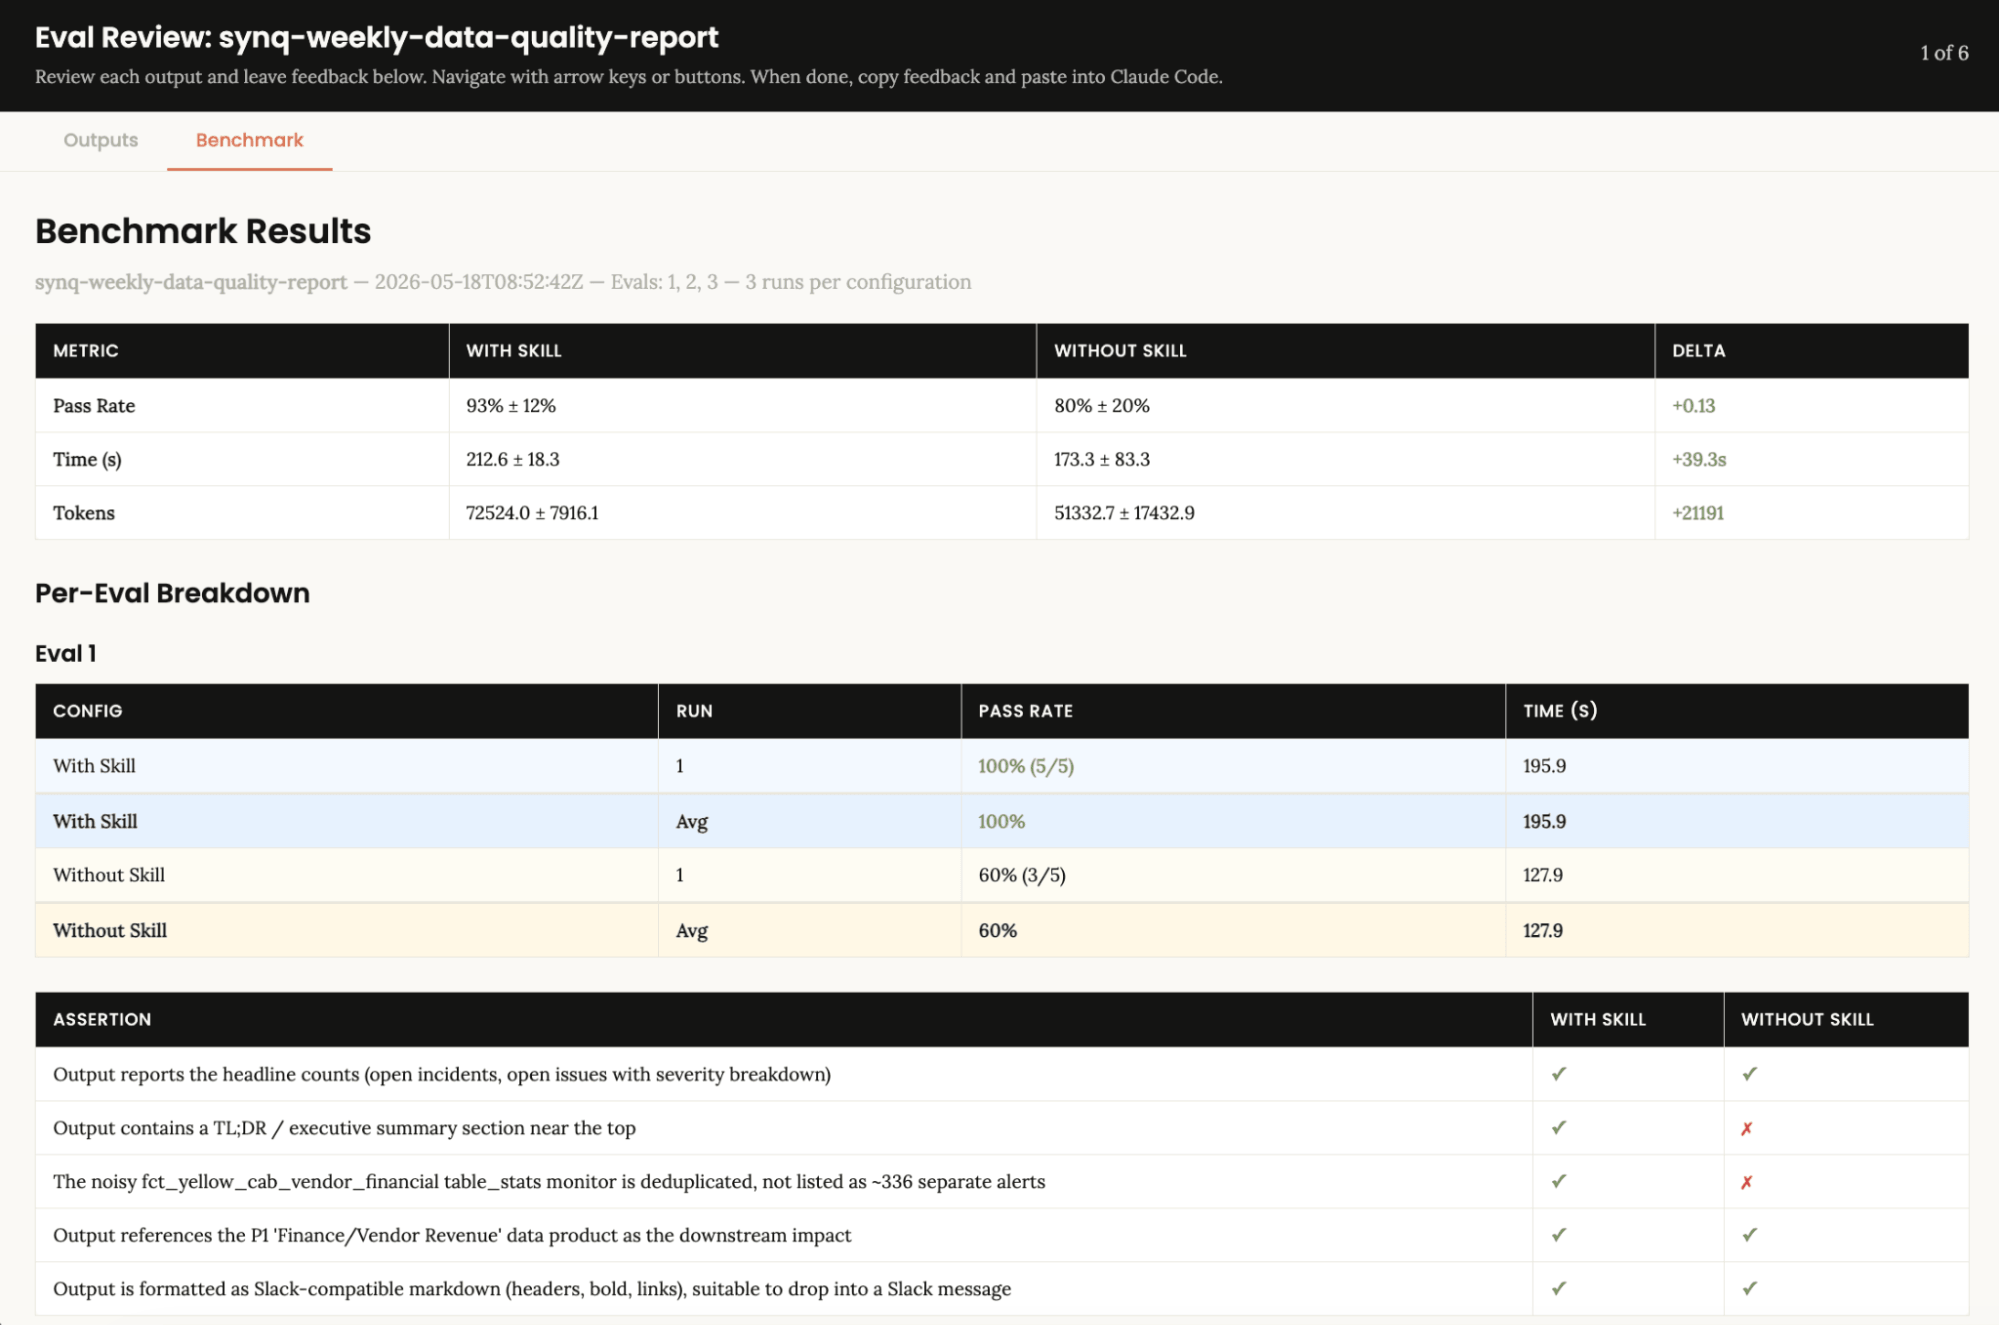 In short, the skill provides us with better output (more of the assertions we're running pass), but on average also adds to the time it takes to complete the task. The extra tokens are the cost of the skill pulling more data (get_issue_impact per top issue and deeper execution history) and following a stricter template. For a once-a-week report, that's fine. With Skills, the variance also drops significantly as they make each task execution much more predictable. Without one, Claude makes structural decisions fresh every time. Sometimes it writes a great report; sometimes it skips the TL;DR or forgets to deduplicate noise. With a skill, the template is enforced. Although we shouldn't read too much into these numbers with such a small sample, they still illustrate the point. Sharing skillsAs you build out a suite of skills, you'll want to share them with your team. There are several ways to this:
For applications, agents, or scheduled workflows, skills are invoked via the API and require a code execution environment. The same skills work in the Agent SDK when you build custom agents. Treat a shared skill like software you install. Pin versions, evaluate before each rollout, and adopt skills only from sources you trust, since a skill can run code and call tools against your data.
Chapter 04
04
Playbooks and Built-In AgentsPutting workflows into production. 01Productionizing MCP workflows
02Built-in agents: Copilot and Scout
03Production-grade playbooks and skills
04When to use which
Playbooks and Built-In Agents
Productionizing MCP workflowsThere are several ways to productionize MCP workflows: as playbooks or as built-in AI agents in the products. Below are a few practical ways we're doing this at Coalesce. Some workflows are core enough to build directly into the product. Others are domain-specific, and we've built production-grade playbooks and skills on top of our MCPs. 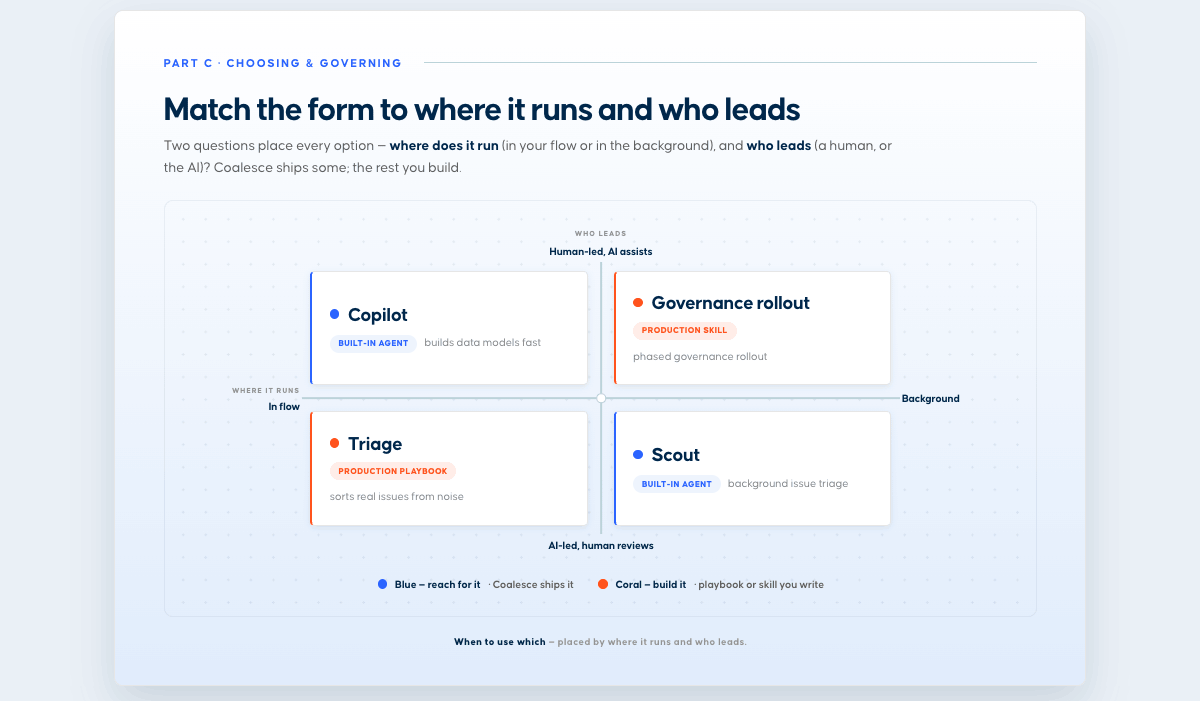 Built-in agents: Copilot and ScoutBuilt-in agents are workflows that are part of the core product, with guardrails already in place. They run where the work already happens, so you do not have to assemble the context yourself. Copilot from Coalesce Transform and Scout from Coalesce Quality are two examples of this. Copilot, in Transform. Lives in the development workspace. You describe what you want in natural language, and it turns that into governed transformations, writing SQL and building staging, dimension, fact, and view layers, keeping lineage intact under the roles and audit already in place. It captures context from the subgraph, and a read/write toggle controls whether it can change anything or only propose. 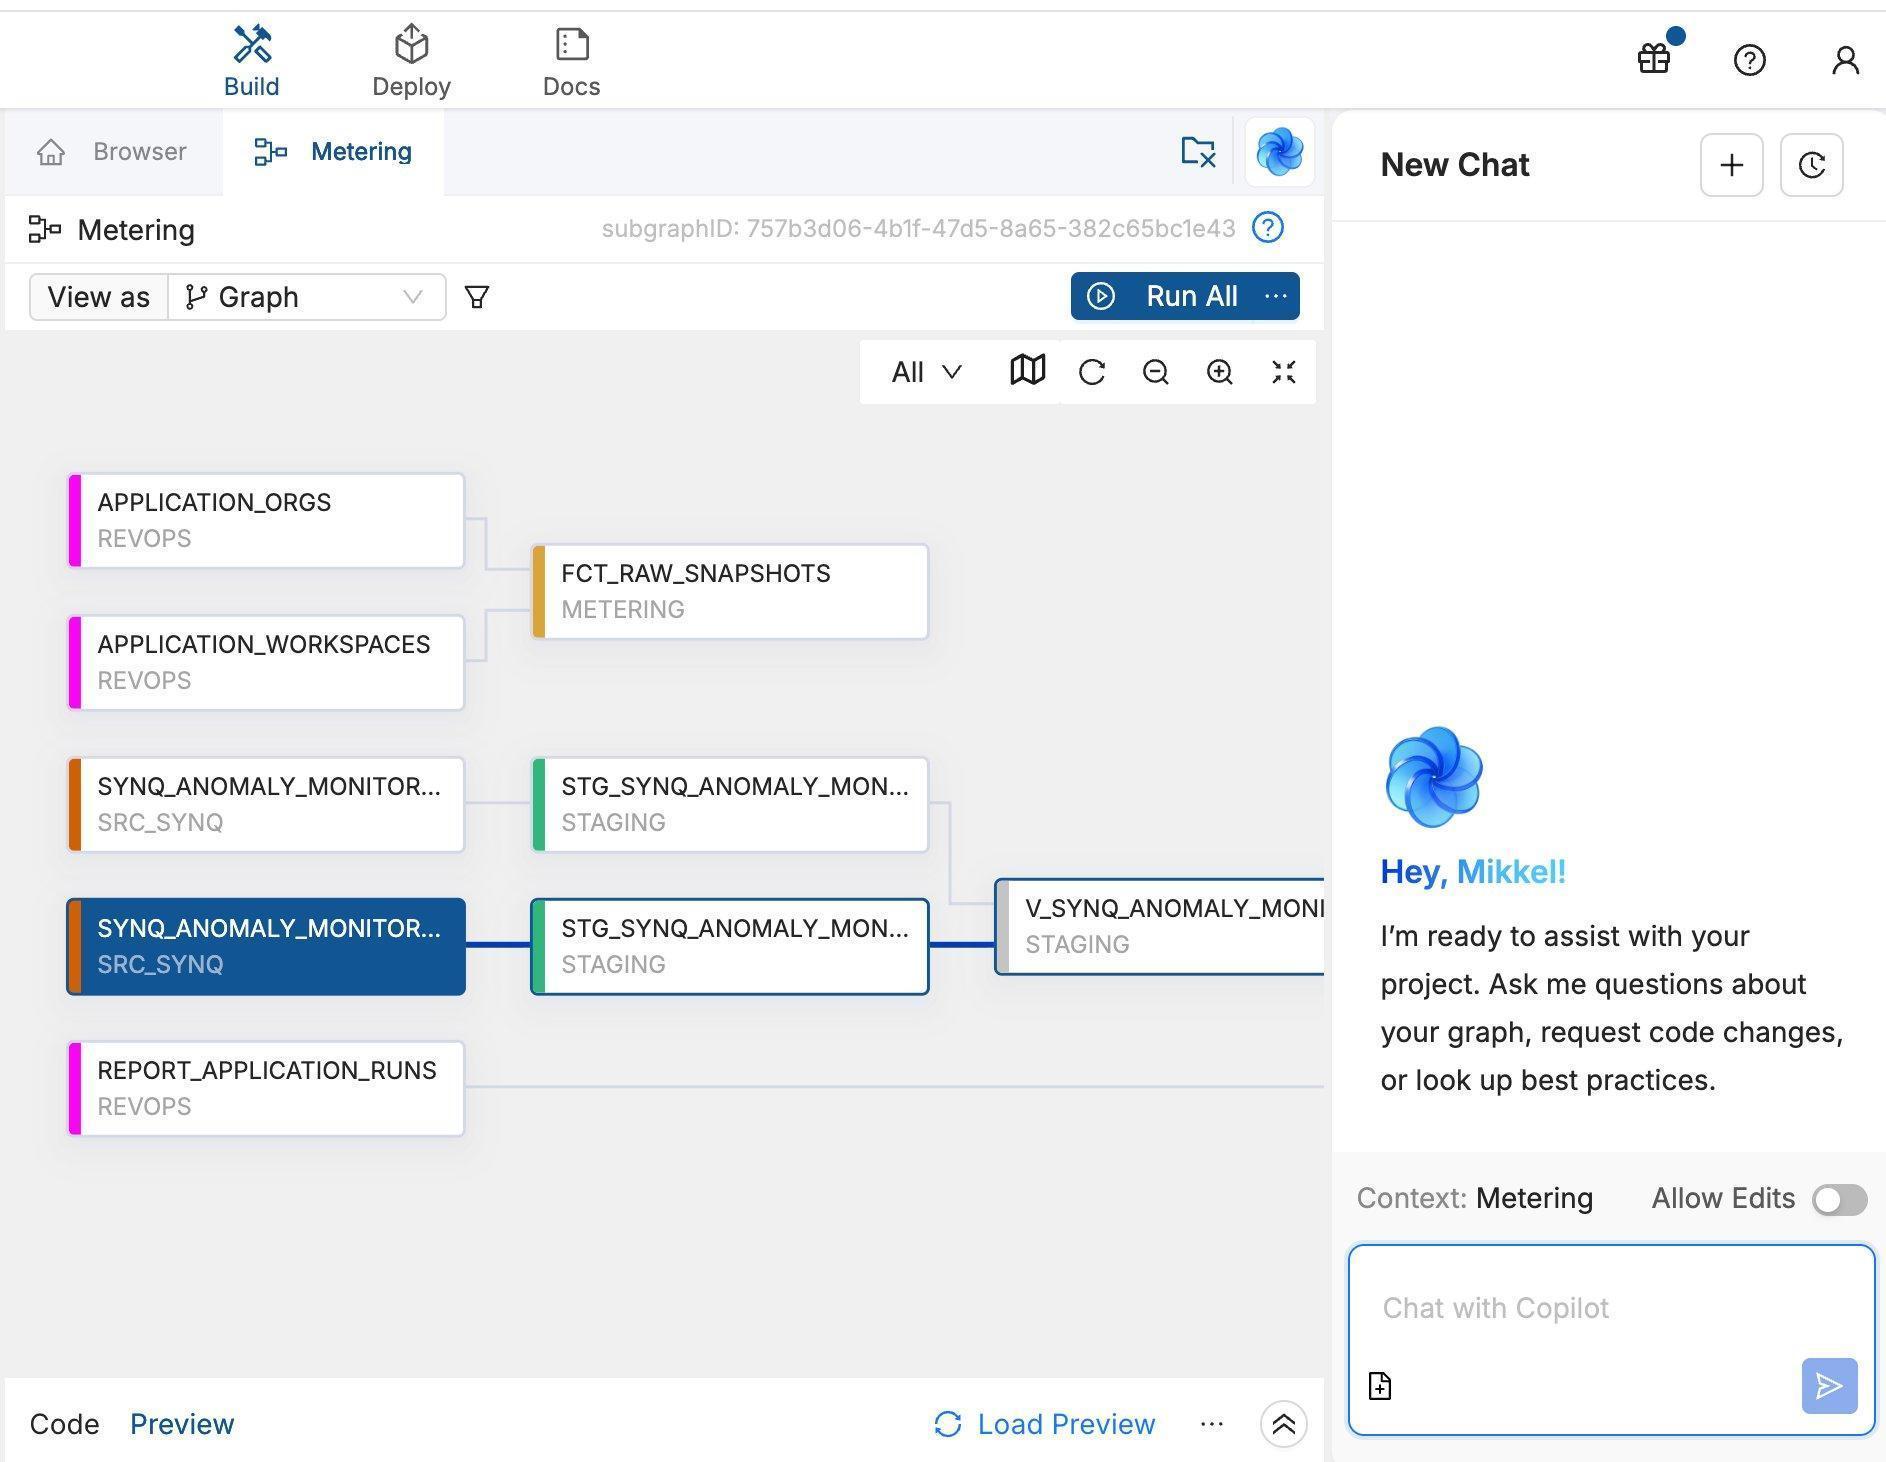 Scout, in Quality. Coalesce Quality's Scout works in the background as an always-on data SRE, running asynchronous agents that kick off their own jobs, working through every open issue around the clock, triaging each by importance, and surfacing a recommended action with the evidence alongside the issue. By the time you open an issue, the investigation is usually already done, so you stay in the loop by reviewing conclusions rather than chasing every alert. In one example, an anomaly monitor fired on a sharp drop in row count, and within seconds Scout had traced it to an intentional code change, linked the relevant commit, and proposed marking the issue as expected. While much of the same analysis is available through the MCP, running the investigations in the background as an agent enables new workflows, such as presenting users with a sorted list of recommended actions across all issues. 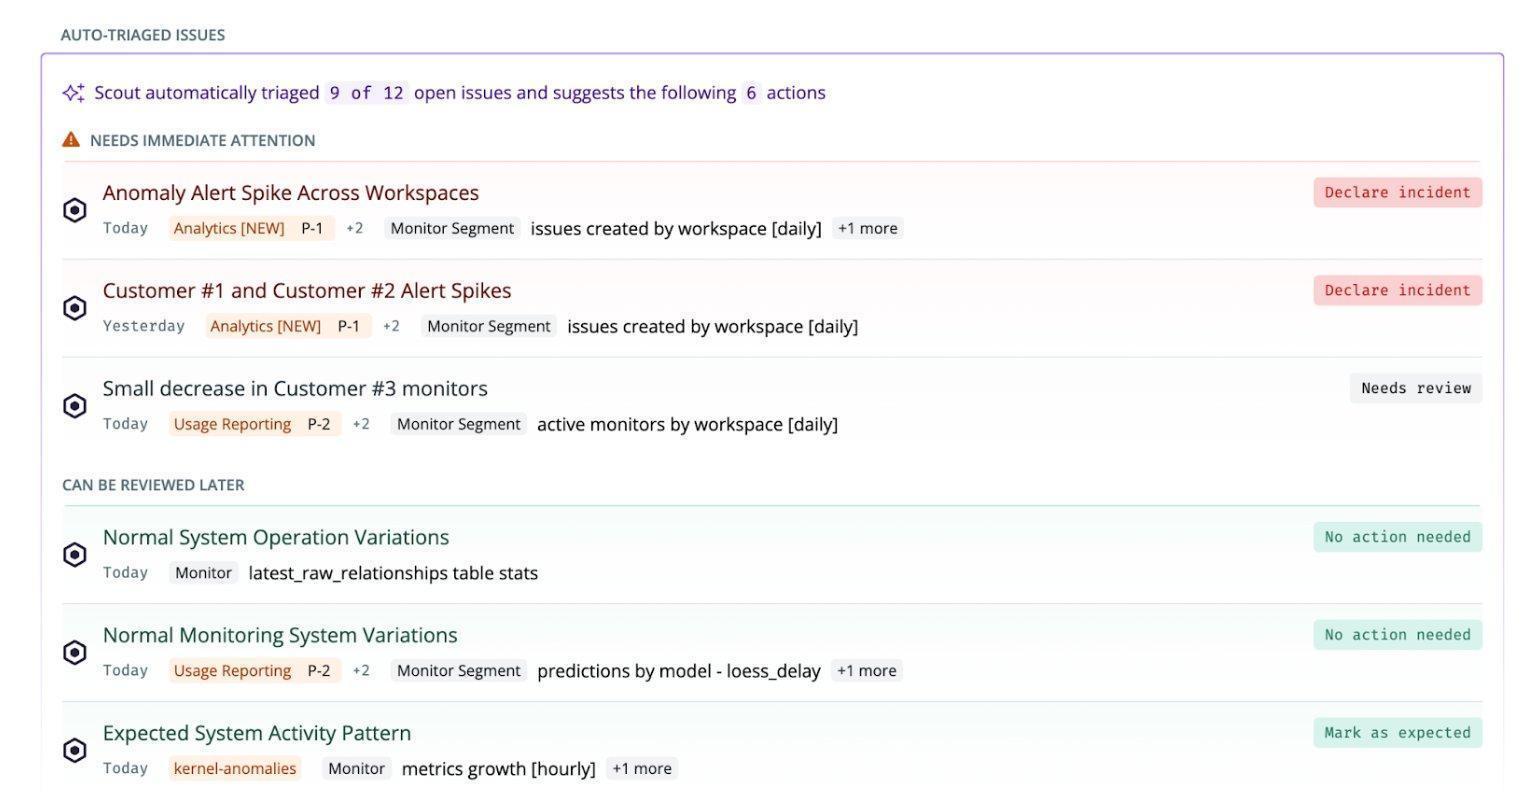 Production-grade playbooks and skillsNot every production workflow belongs in the product. When something is specific to how your team works, it is often better to build it on top of the MCPs as a playbook, running on a set schedule. Customer issue triage. Runs automatically each morning against the workspace that monitors our production systems: the ClickHouse tables, Postgres, and job queues. It groups related issues, queries the data, reads logs, drafts likely root causes ready to share with customers, and tags the person on rotation that week. It replaces an otherwise lengthy manual investigation. 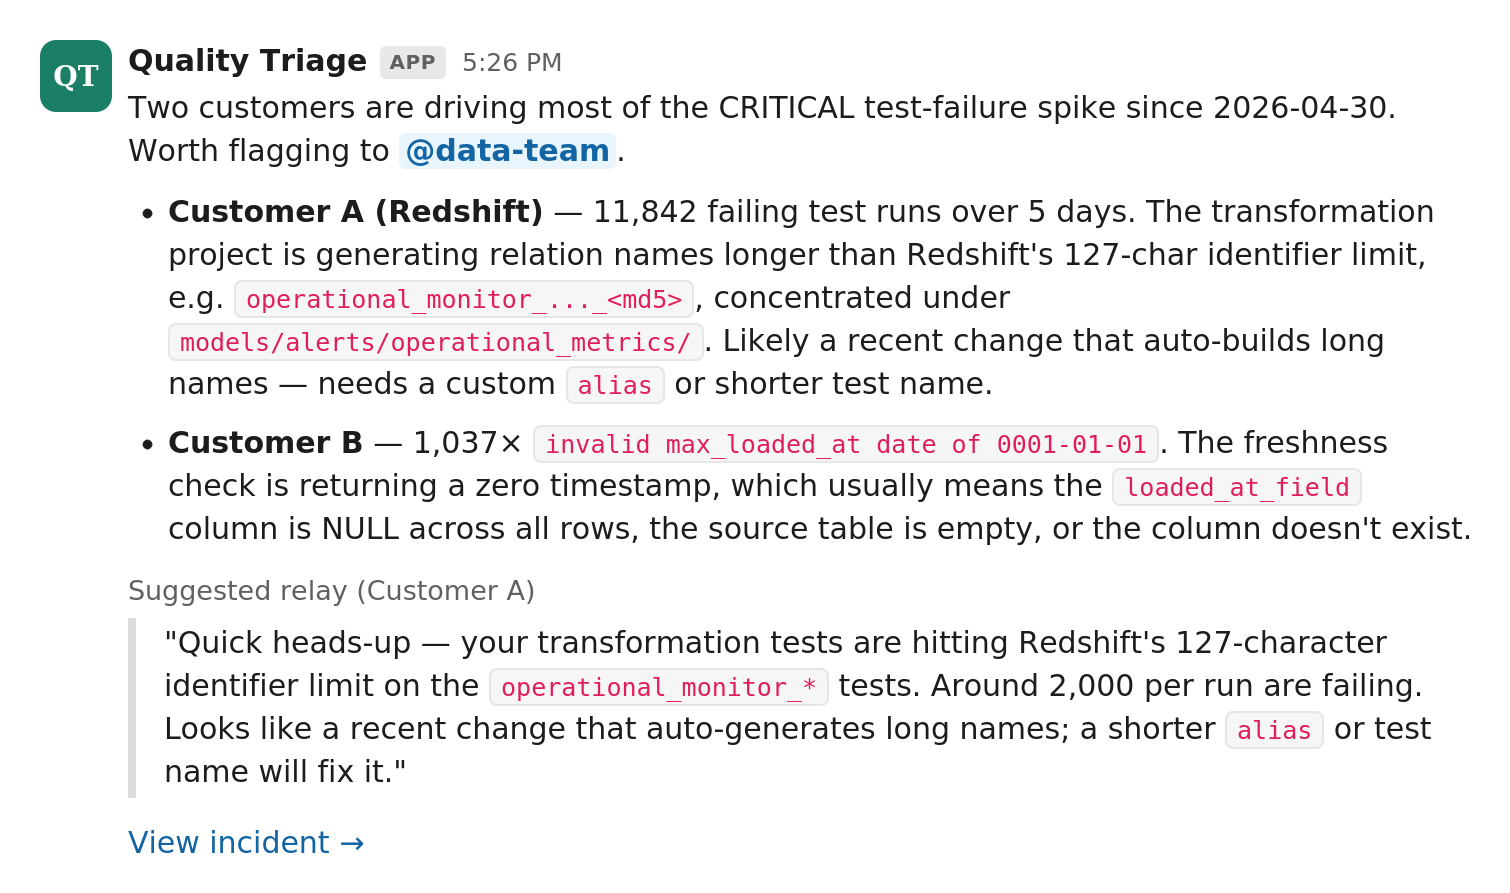 Governance rollout. Takes a team from zero to a governed catalog in 8-12 weeks. It writes descriptions before assigning owners, classifies assets into tiers, caps Tier-1 at roughly 5% based on real usage signals, and assigns an owner, an effort estimate, and a measurable exit criterion to each phase that the agent can check itself. When to use whichWe start from a prompt for exploration, then build skills for repeatable tasks, playbooks for repeatable workflows, and finally a built-in agent for the workflows that fit better into the product. 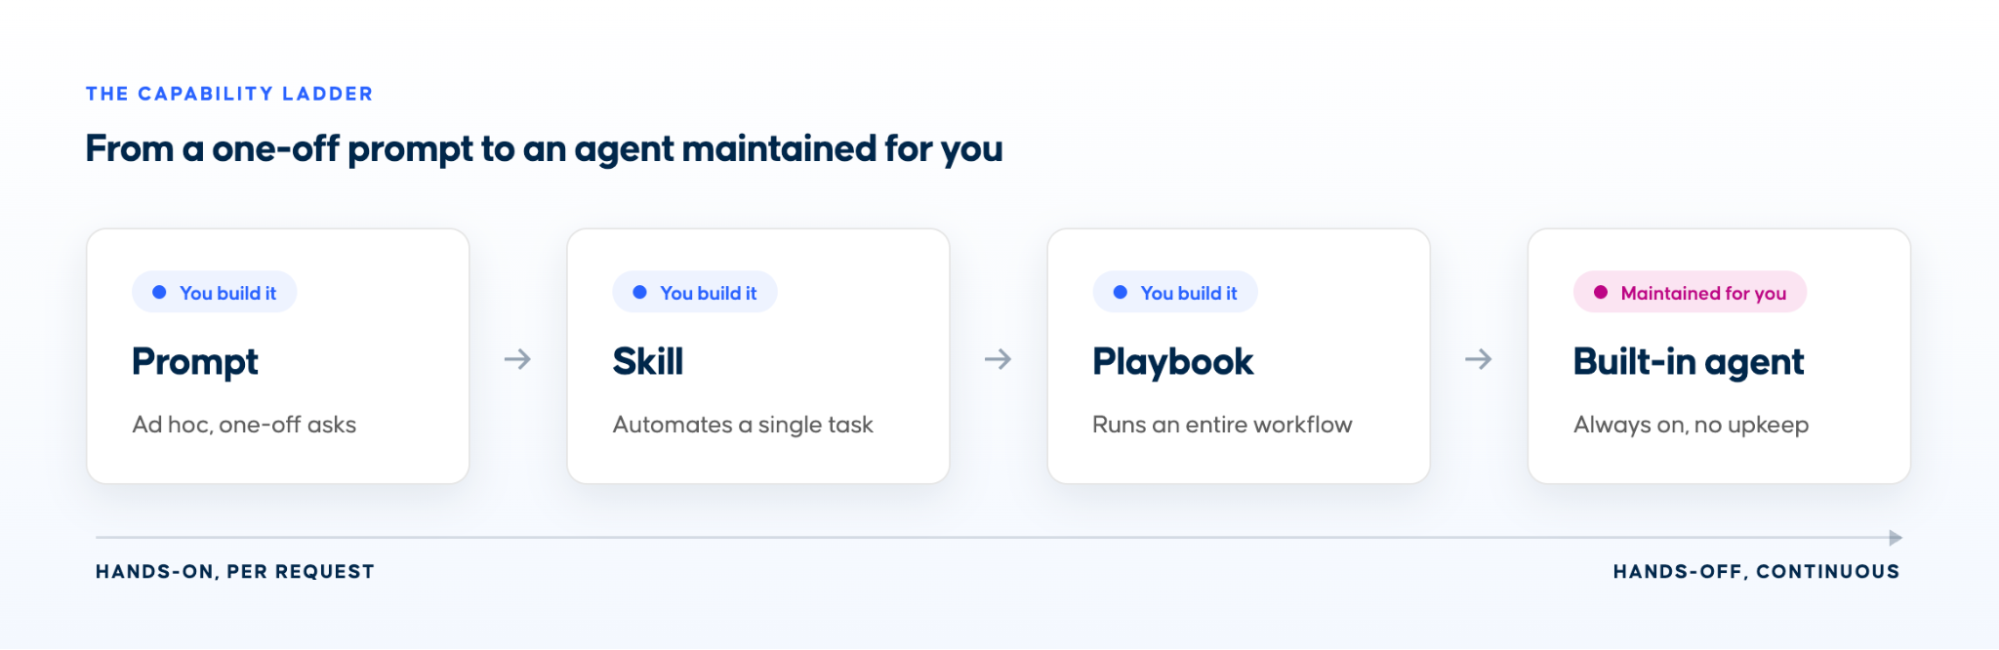
Getting started
Coalesce MCPsYou can download and install the Coalesce MCPs in your workspace using the following links
About Coalesce
Coalesce is the only data transformation and governance platform designed for the AI era. Built on a metadata-driven framework, Coalesce gives data teams the speed to build and deploy transformations 10× faster—while enforcing the standards, structure, and governance needed to scale sustainably. With Coalesce Catalog, transformation and metadata management come together in a single solution, enabling discovery, trust, and collaboration across the business. Whether accelerating AI-assisted migrations from legacy tools or future-proofing enterprise data architectures, Coalesce provides the guardrails and efficiency to keep data teams AI-ready.
From a single ad hoc prompt to a production playbook. Whether you are exploring on your own, building skills for your team, or putting workflows into production, you will find practical tips and real examples throughout.
Transform · Catalog · Quality
|